The Animated GIF is a popular way to visualize a design concept (here’s an example of how we did it for the post text effects created with CSS) or show off a short video clip. But if you have too many of them in the same page, it will deviate your user’s focus. For pages that showcase a lot of GIFs, this is bad news.
The solution: serve users with a static image and only allow the animated GIF to run upon user-click. In this short tutorial we’re going to show you how to do just that.
Getting Started
Begin with preparing the project folders and files which include: an HTML file, the jQuery, and lastly a JavaScript file where we will write our code. You may link jQuery to a CDN or grab the copy and link it to your project directory. I would leave the styles and CSS to your imagination. The most essential part is the HTML markup is as follows:
<figure>
        <img src="img/mobile-wireframe.png" height="300" width="400" alt="Static Image" data-alt="img/mobile-wireframe.gif">
</figure>
<!-- add more images -->
Notice the additional data-alt attribute in the img element. This is where we store the GIF, in place of the static image which we initially serve. You may add more images and also add a caption for each through the figcaption element.
After that, we will write the JavaScript that will bring the magic. The idea is to serve the GIF image when the user clicks on the image.
The JavaScript
First, we create a function that will retrieve the GIF image path we have put in the data-alt attribute. We will loop through each of the image and use the jQuery .data() method to do so:
var getGif = function() {
        var gif = [];
        $('img').each(function() {
                var data = $(this).data('alt');
                gif.push(data);
        });
        return gif;
}
var gif = getGif();
We run the function and save the output in a variable gif, as above. The gif variable now contains the path of the GIF from the images in the page.
Image Pre-loading
We now have a loading problem: with the GIF not yet loaded, there is a chance that the animated GIF would not play instantly (since the browser would need a few seconds to fully load the GIF). This delay would be felt more significantly when the GIF image size is large.
We need to pre-load, or load the GIFs simultaneously as the page is loading.
// Preload all the GIF.
var image = [];

$.each(gif, function(index) {
        image[index]     = new Image();
        image[index].src = gif[index];
});
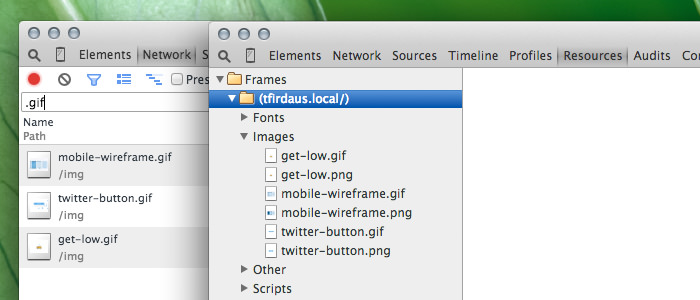
Now, open the DevTools then head over to the Network (or Resources) tab. You will notice that the GIFs are already loaded even though they are saved in the data-alt attribute. And the following is all the code you need to do so.


The last piece of the code is where we bind each figure element that wraps the image with the click event.
The code will swap the image source between the src attribute where the static image is served and the data-alt attribute where we initially serve the GIF image.
The code will also revert to the static image as the user clicks a second time, “stopping” the animation.
$('figure').on('click', function() {

  var $this   = $(this),
          $index  = $this.index(),

          $img    = $this.children('img'),
          $imgSrc = $img.attr('src'),
          $imgAlt = $img.attr('data-alt'),
          $imgExt = $imgAlt.split('.');

  if($imgExt[1] === 'gif') {
      $img.attr('src', $img.data('alt')).attr('data-alt', $imgSrc);
  } else {
      $img.attr('src', $imgAlt).attr('data-alt', $img.data('alt'));
  }

});
And that’s it. You can polish the page with styles, for example, you may add a play button overlaying the image to indicate that it is “playable” or an animated GIF.
Check out the demo and download the source here.
The post How to Play Animated GIFs onClick appeared first on Hongkiat.
https://goo.gl/hYDEHJ
No comments:
Post a Comment